


How to Weld Plastic with the Triac ST
Do you know why plastic is often chosen over steel? Plastic has the same structural strength as steel because of its greater elasticity. Plastic can absorb minor impacts, whereas steel can be deformed to the point of not being repairable. And best of all, if plastic is damaged, there’s a great possibility that it can be repaired with welding, and no component strength is lost.
If you want to repair plastic through welding, you’ll need the right tool, and that’s where the Leister Triac ST plays an integral role. Whether the plastic is warped, cracked, suffered a loss of material, or has a split, the Triac ST can remedy the problem. This makes plastic a more suitable material than steel as damaged steel takes time and money to fix.
Another advantage of welding plastic is that, when correct procedures are followed, fumes are not produced. Plus, it’s possible to restore plastic components to a new condition without using special treatments or fillers. If you add in the right repaint procedures, your repair will be invisible.
So how do you correctly weld plastic with the Triac ST? This comprehensive guide will provide the answers.
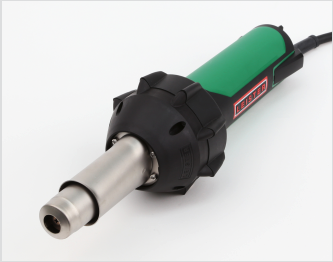
A quick look at the Triac ST
As expected with any Leister product, the Triac ST heat gun is a top-quality tool. The Triac ST is Leister’s culmination of knowledge and expertise that Leister has gained from making heatguns for the past 60 years. Versatile, reliable, and easy to use, the Triac ST features a two-component handle providing the perfect grip for users. Its light build at under one kilogram in weight also results in optimum weight balance.
Additional highlights of the Triac ST:
- Temperature: 104-1292°F (40-700°C)
- Airflow 20 CFM (max temperature)
- Voltage V~: 120
- Heat-protective adaptor tube
- Electronic heating element protection
- Quick clean air filters
- Automatic motor shut-off with minimal carbon level
- Suitable for work sites
Identifying the plastic you’re working with
In vehicle manufacturing, most plastics used are thermoplastics. Thermoplastics can generally be welded when needed. With that said, there are several different thermoplastics used, and each has a specific temperature point for welding,
The good news is that thermoplastics are easily identified. For plastic components on vehicles, vehicle manufacturers use material identification codes. Simply find the thermoplastic code to know which welding temperature to use.
| Code | Plastic | Welding temperature |
|---|---|---|
| ABS | Acrylonitrile Butadiene Styrene | 662°F (350°C) |
| PC/ABS | Polycarbonate/Acrylonitrile Butadiene Styrene | 662°F (350°C) |
| PA | Polyamide (Nylon) | 752°F (400°C) |
| PBT | Polybutylen Terephtalate | 662°F (350°C) |
| PC | Polycarbonate | 662°F (350°C) |
| PE | Polyethylene | 572°F (300°C)(hard) 518°F (270°C)(soft) |
| PP | Polypropylene | 572°F (300°C) |
| PP/EPIDM | Rubber-modified Polypropylene | 572°F (300°C) |
| PUR | Polyurethane | 572°F/662°F (300°C/350°C) |
| PVC | Polyvinyl Chloride | 572°F (300°C)(hard) 662°F (350°C)(soft) |
| GRP/SMC | Glass Fiber Reinforced Plastics | N/A |
Note: Not all polyurethane (PUR) is weldable. Glass fiber-reinforced plastics are not weldable.
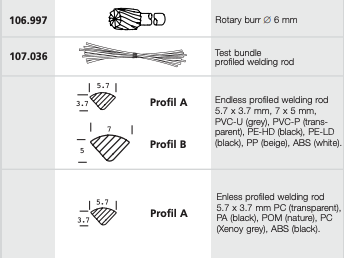
What if you’re dealing with polyurethane or don’t have the required information to identify the plastic you intend to weld? Fortunately, you can conduct a test weld.
A test weld is done by using an appropriate plastic welding rod, which is included with your Triac ST, on the back of the plastic component. You’ll then test different temperatures until you find the optimum one for welding.
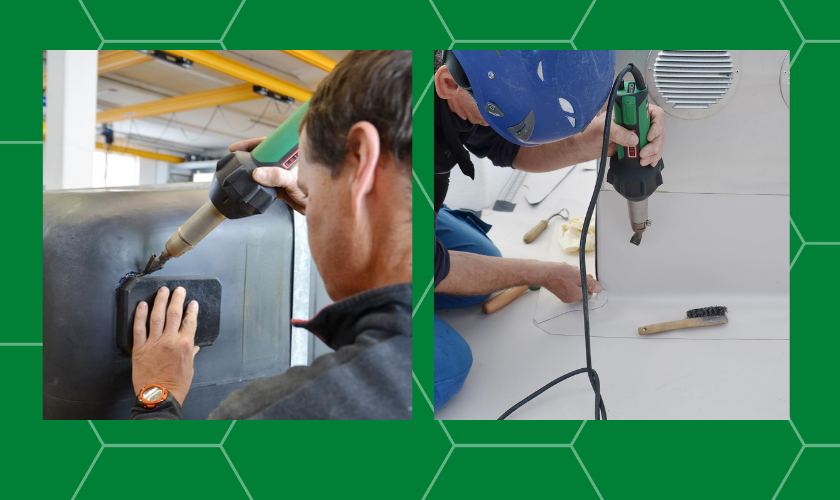
How to weld with the Triac ST
This section will teach you how to weld using the Triac ST. While Triac ST makes the job an easier one, there are still several steps to complete the job.
1. Surface preparation

The first step might not seem considerable, but don’t discount the importance of preparing the surface of the weld-bound plastic component.
There are various aspects to consider when it comes to surface preparation. First, you have to decide if the plastic component is going to be repaired from either the front or rear. This decision will come down to which option provides the greater access. You can utilize reinforcement welds to the rear of a front repair, as this can repair the strength lost due to the damage suffered by the plastic component.
When the damaged component has a protective or decorative trim, it has to be removed if the damage goes beyond the trim. The trim must be separated to grant you full access to the area that needs repairing. You should only do this removal if the trim isn’t cold to prevent unrepairable damage.
The good news is the trim is usually fixed to the component with an adhesive that softens by using an appropriate heat treatment. That appropriate heat treatment can be supplied by the Triac ST. This tool can deliver 230 liters of air per minute and can be done at a wide range of temperatures – from a relatively cool 68°F (20°C) to a blazing hot 1292°F (700°C).
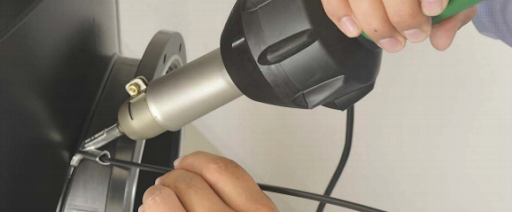
As for trim removal, set the temperature at 572°F (300°C) and use the Triac ST without the welding nozzle attached. Move the device evenly over the trim surface to deliver heat absorption to soften the adhesive. Once soft, you should be able to pull away the trim with ease. Place it to the side so it can be reused following the weld repair.
2. Welding groove
To ensure the welding rod is accepted, a 90 V-shaped groove has to be prepped along the crack.
The first step in the welding groove process is to remove any paint that might exist within the repair area. You can do this with a D/A sander or body file. Remove any paint that’s within 15 millimeters of the damage. As for materials that may have become trapped due to impact, applying heat of about 392°F (200°C) will typically help release them. However, if that doesn’t do the job, a screwdriver blade is a useful tool to free any trapped materials.
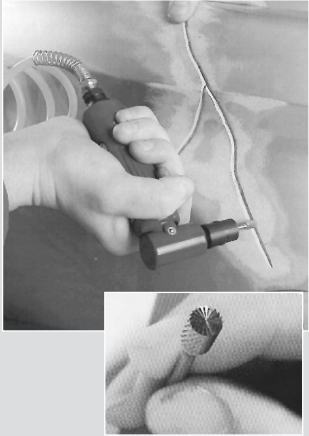
The V groove can be formed in two main ways. One way is to utilize a square-edged file to carefully form the groove. The better method, however, is to use a rotary burr bit complete with a cutting edge. A 90° groove is created in one operation, and this includes following incredibly erratic crack courses. Keep in mind the groove depth should never go beyond two-thirds of the material’s thickness.
A high-speed drill will provide the best results. When you use a slow drill or a burring tool with a single cutting face, the device could jump out of the groove and cause imperfections. Once done, the welding rod should sit within the groove. The rod’s upper curve face should protrude about 1 to 2 millimeters above the repair’s surface to ensure enough penetration depth for the rod. There’s no requirement for fillers.
During the burring operation, safety is paramount. Make sure to wear a dust mask and eye protection to prevent plastic particles from causing irritation.
3. Tack welding
A welding project is completed in two stages. The first stage is tack welding the crack’s base. Due to the heat, the welding effectively knits together the sides of the crack – aligning both sections of the component as a result.
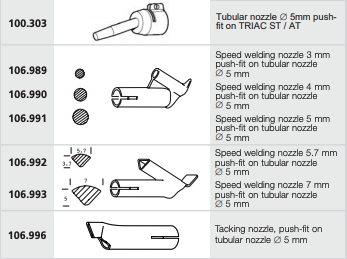
When using the Triac ST for tack welding, make sure to attach welding nozzle 28 to the standard nozzle. Then ensure the temperature matches the type of plastic you’re working on. Instead of completing the tack welding in parts, it’s recommended to do so end-to-end in one continuous motion by taking the welding nozzle tip and drawing it across the base of every V groove. When doing this, the nozzle’s heel should be slightly raised while you ensure its toe is in constant contact with the groove’s base. Make sure the angle doesn’t go beyond 20° when measured against the angle of the groove base.
How does the nozzle work? As you move the nozzle along the crack, the plastic situated below the nozzle’s heel is softened by the hot air. The toe then brings together the softened material. A helpful tip to keep in mind is to apply pressure with the tool during the weld because the groove is thin and not strong.
If the panel sides of the groove suffer a minor misalignment, it can be corrected by simply holding the sides in place until the tack welding has cooled and knitted. This approach can also help when you insert new material. To further increase the weld’s strength, you can use cross welds to the underside.
4. Main welding
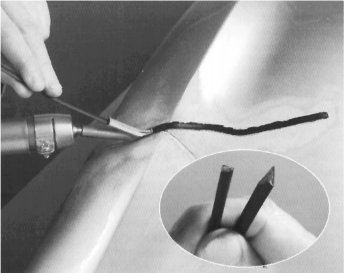
The main part of the welding process starts by preparing the welding rod. By using either side cutters or a trimming knife, turn the rod’s end into a pencil-like point. Cutting it this way ensures the V groove receives a progressive fill, which is especially important when you start within the center of the panel as it prevents the formation of bulging plastic protrusions.
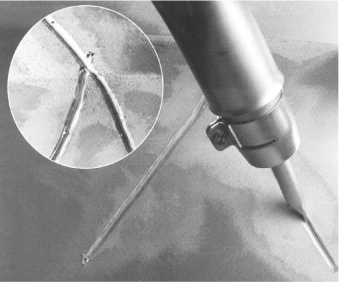
After attaching the 5.7mm or 7mm speed welding nozzle to the Triac ST, set the tool to the correct temperature for the plastic you’re working with. Sit the Triac ST down for a couple of minutes so it can warm up.
Remember the trimmed welding rod? Insert it into the nozzle feed, continuing until about 5 millimeters of the rod sticks out on the underside. Keep the Triac ST steady so that the welding nozzle runs solely along the crack, which is parallel to the plastic component surface. Note: The rod has to stick out and be held beyond the V groove’s start to ensure heat for the weld is directed towards the start point.
Once the surface plastic displays slight wetting signs, begin moving the welding nozzle across the groove. A 3mm air gap should be maintained under the heel of the nozzle. Ensure the rod is steadily fed into the nozzle, going with approximately 2.5 kilograms of pressure to push the rod sufficiently into the groove. Always attempt to complete this part with one continuous run when possible.
Completing the job
Once the weld has been completed, the work isn’t finished. There are two remaining steps: welding dressing and painting.
1. Welding dressing
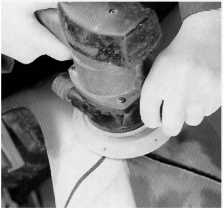
With a successful weld, the component surface will feature a slightly raised bead that will need to be flattened for the component to regain its natural appearance.
Flattening the bead requires welding dressing in which a grinding disc is used to smooth out the bead. Keep in mind that despite its overall structural strength, plastic is still a soft material. An abrasive disc is going to easily break down the plastic. Therefore, first use a 120-grit disc, and then progress to a 180-grit disc before finishing with a 320-grit disc. Doing so will result in a smooth finish.
If you want to go a step further with the smoothness, it’s recommended to use a very fine abrasive paper. Around each side of the weld area, allow a margin of between 7-10 centimeters for dressing, which is essential for painting.
Note: Only complete this process when the weld is cold. The sanding disc will become clogged with warm welds.
2. Painting plastics
After the welding dressing, you’re ready for the final step of painting. Unfortunately, not every paint type is applicable for use on plastic. However, the good news is that there are various paint types available for plastic components. To find an approved paint type, contact the vehicle manufacturer for more information.
Start the painting process by thoroughly cleaning the plastic component to ensure high-quality paint adhesion. Before using any cleaning agent, check to see if it’s compatible with the paint type you plan to use.
For a completely invisible repair, paint the entire component, not just the welded area. The end result is a plastic component that not only has an immaculate cosmetic finish but will also be as strong and reliable as it was originally.
Using the Leister Triac ST for your plastic welding needs will help you get the perfect repair. And here at Heatgun, not only can we provide you with the Triac ST, but we’re also here to provide you support and answer any questions you may have. Contact us anytime!
Return back to the Heatgun blog.